There are numerous points in the application allowing users to print and export content. The options appears in several apps, but it has different functions. The print button usually appears in the status bar of each app in the pro client (but not always).
- Model - prints out the model flow summary document.
- Discover - prints out the current report
- Publish - launches the "print-now" publication engine for the template
- Present - the printing option is only available once the presentation is running (from either the right-click context menu or the dashboard fly-out menu).
Printing is not available for:
- Formulate has no printing options
- Illustrate has no printing options, because the illustrations are normally printed has part of presentations or publications
Accessing the Print Functions in different clients
Printing is available for users from the Full Pro Client and the Viewer Client - for content loaded via the application or directly (via URL). Limited printing options are available from natively embedded content (content embedded via code). These capabilities are device independent and will work from desktop or tablet devices. Printing is not possible from the mobile application.
Print Dialog
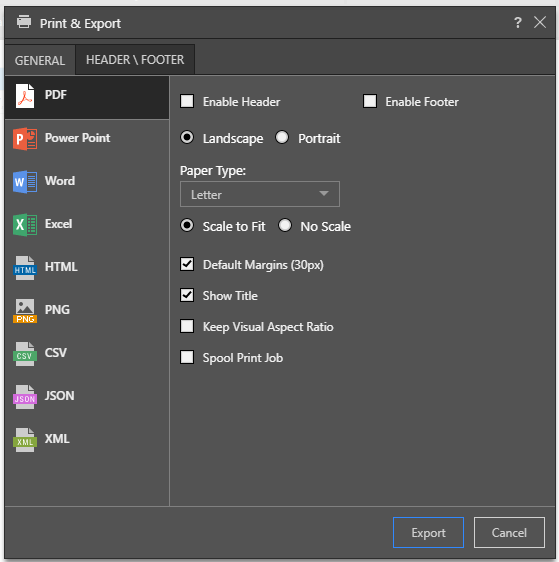
When printing content, the user is presented with a common print and export dialog that has subtle differences based on the app.
Note: When printing the summary from Model, the user is not prompted with a dialog. The content (as PDF) is simply returned directly to the client.
Common Settings
The following settings are common to all the printing dialogs in each app:
- Output Type: PDF, PowerPoint, Word, Excel, HTML, PNG, Comma Delimited text(CSV), JSON text, XML text
- If exporting to Excel, choose whether or not to freeze worksheet panes. See below for more details on exporting to Excel.
- When exporting to PowerPoint or Word, choose the image quality
- Some of the text options are not available when exporting multiple queries, since they are designed to only hold a single query structure.
- Page orientation: Landscape or Portrait. Note: the page orientation should match the page's design to best reproduce the layout
- Paper Size or Type: These are choices for the physical "paper" size. The printed output will be sized based on the paper size chosen. Note: the page size should match the page's design size to best reproduce the layout.
Beyond the common settings, each app has some specific print / export options.
- When exporting from Discover select Spool Print Job to send to the job spooler, to process the request in the background.
- Choose default page margins or set custom margins for the top, bottom, left and right sides
- Choose whether to fit the content to a single page or allow it to flow over multiple pages.
- Select whether or not to keep the visuals aspect ratio

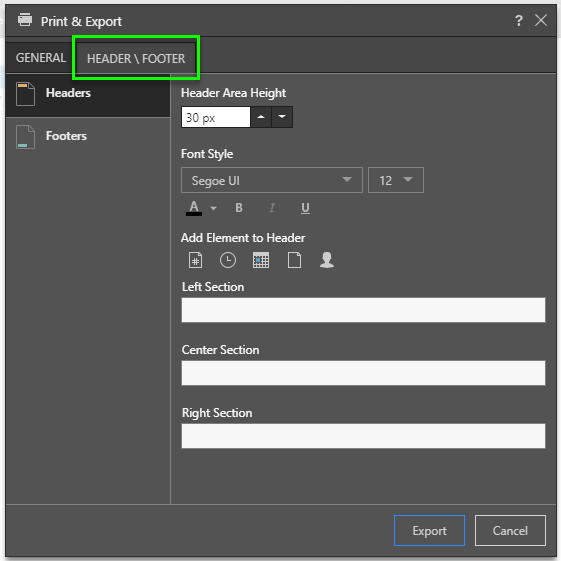
Discover prints can also include headers and footers - which need to be enabled on the "general" panel and then set on the second tab (green box below).

- For each header or footer, inject the text elements you want to appear on each page: page number, print time, print date, report name and user name
- You can also set the styling of the font for the header or footer independently.
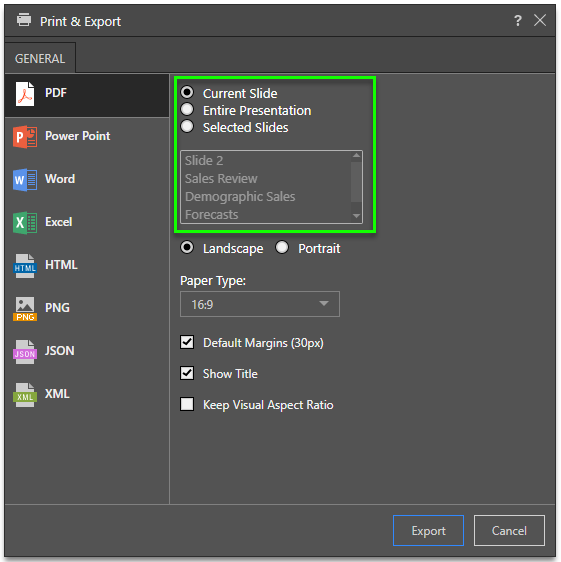
Printing in a presentation is only possible once the presentation is launched and running (a.k.a "runtime"). When printing from Present, you'll need to select which part of the presentation book or publication should be exported:
- Current Analysis: export the slide currently being viewed
- Entire Book: export the entire presentation
- Selected Documents: specify the slide(s) that you want to export
NOTE: any interactions applied at runtime (like drill down, dice, sorting, filtering, slicer interactions, etc) will be reflected in the exported presentation.

Like Discover, there are other options too:
- Choose default page margins or set custom margins for the top, bottom, left and right sides
- Select whether or not to keep the visuals aspect ratio
When printing from Publish, you are effectively running the publication rendering engine manually (without the scheduler). When exporting from Publish there are fewer settings, since most of the printing choices are "baked" into the publish template's design. However, you'll need to select which part of the publication should be printed:
Slicer Selections
The first (and most important) choice when publishing is to choose which slicers will be used to drive the queries in the publication (green box below). Any slicers added to the publication will show up in the (scrolling list).
After that, the user needs to choose which pages to print:
- All Pages: export all pages in the publication
- Current Page: export the publication page currently being viewed
- Selected Pages:specify the page(s) that you want to export

Like Discover, there are some other options too:
- Select Spool Print Job to send to the job spooler, to process the request in the background.
- Select whether or not to keep the visuals aspect ratio
Export to Excel
When exporting to Excel, each visualization is exported as a matrix grid to a separate Excel sheet (unless the exported visual is a tabular or raw results grid, in which case it will be exported as a flat). The sheet tab is named according to the report title, which is also added at the top of the Excel sheet.
For performance reasons, an evaluation based on the machine's memory takes place when exporting to Excel, limiting the amount of cells that can be exported:
- On a 32G machine and above, the limit is 9M cells.
- On a 24G machine, the limit is 7M cells.
- On a 16GB machine, the limit is 5M cells.
- On an 8GB machine or less, the limit is 3M cells
If the limit is reached, all cells will be exported to CSV, rather than Excel. Note that CSV is a flat/ raw grid format.